In previous blog posts we’ve spoken about how rapid evolutions in technology have led to a greater adoption of virtual and augmented reality. But what you don’t often hear about is conducting user research and usability testing within these environments.
As a quick recap:
- Virtual Reality (VR) describes a three-dimensional, computer-generated environment that can be explored and interacted with by a person. That person is fully immersed within this virtual environment through a VR headset or head-mounted display, which gives them a 360-degree view of an artificial world. Coupled with headphones, good VR can trick your brain into making you feel completely removed from your physical location. Many people know about VR through head mounted devices like Oculus Quest, HTC Vive or Google Cardboard.
- Augmented Reality (AR) Unlike VR, AR doesn’t provide full immersion. Instead, AR enhances your view of the real world by overlaying what you see with computer-generated information like images, text, and animations. Today, this technology is often used in smartphone applications that require the user to hold their phone in front of them. By taking the image from the camera and processing it in real time, an app can display contextual information seemingly within the real-world environment. AR experiences and games include Pokémon Go and Snapchat filters.
Considerations when testing AR/VR experiences
If you are creating a virtual or augmented reality product, there are several things to consider when conducting user testing. We break them down into 6 main points:
- Participant recruitment
- Nausea and dizziness
- Testing environment
- Device hygiene
- Device management & set up
- Session observation
Participant recruitment
Whilst VR Headsets are (mostly) designed to accommodate users who wear glasses, speaking from experience as a glasses wearer myself, it can depend on the device you are testing with. Headsets like the Oculus Quest 2 come with a dedicated glasses spacer included in the box; however, others may not have such a feature included. It is worth knowing if your participants wear glasses and, if they do, whether your chosen VR hardware can comfortably accommodate those participants.
It’s also worth noting that when recruiting participants, most people are inexperienced when it comes to using AR/VR, so they are more likely to react positively. This feedback may not be representative of the usability of a product but more of the novelty of the thing.
Even those who have a perceived greater experience with the technology still may not be that experienced. Even those with an Oculus rift or a PlayStation VR at home may only use it occasionally. Make sure you provide examples in your screener survey that give potential participants real world examples of how to identify their current experience, i.e. “I use my VR headset at least one a day/week/month for gaming.”
Dizziness and nausea (more on this in a moment) are common reactions to extended periods of VR technology use. Like travel sickness, not everyone will be affected, and some will be more susceptible than others. It is worth adding an extra question to your screener survey to see if a potential participant typically suffers from motion sickness to determine whether they will be suitable (and more importantly safe and comfortable) to take part in the study.

Nausea and Dizziness
The main roadblock for testing in VR: no one wants to test a product that could potentially make them sick. It is highly likely participants will experience “cyber sickness” during testing, and this is especially true when participants are inexperienced with the technology. In some cases, it might be a sign of poor VR design, but this isn’t always true. To keep your participants comfortable during testing, we must understand a bit about human physiology.
Motion sickness is caused when visual cues clash with the sensory information received by the inner ear’s vestibular system. For example, if you’ve ever tried to read a book in a moving car, your eyes are taking in static information from the fixed point of a book, but the vestibular system feels the conflicting sensations from the motion of the car. Cyber sickness can be thought of as the opposite of motion sickness. You have a visually induced perception of motion, but the vestibular system feels no such motion.
There are a few ways to help reduce this mismatch between sense and perception when testing with VR. Low latency and high refresh rates help with the idea of ‘presence’ in VR and what makes in a ‘realistic’ experience. The higher the refresh rate and the lower the latency, the more your virtual world seems ‘real’.
Adding a fixed anchor point in the real world also helps, like the plane controls in a flight simulator. There is also a technique called Nasum Virtualis which projects a virtual nose into the virtual world as an anchor point, and research seems to suggest it works.
Whilst the horizonal field of view must be more than 90 degrees for VR, limiting the field of view is also a good way to reduce cyber sickness. You don’t need your peripheral vision as much when moving, and narrowing the field of vision helps reduce nausea.
Of course, and it goes without saying, take things slow, don’t force movement, and make sure the participant is always in control. Be sure to have water on hand and that participants can take breaks from the immersion. If all else fails, make sure you have a bucket nearby.
Testing environment
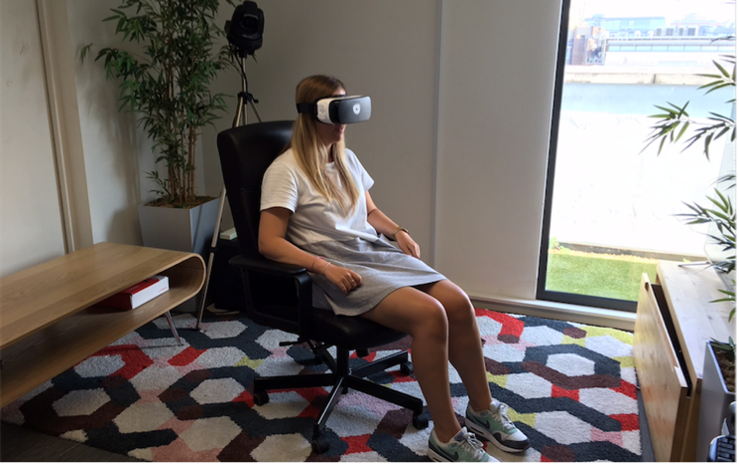
The obvious difference between VR and AR testing, when compared to more typical usability testing, is you’re going to need a lot more space in the research environment. Not only will participants need enough space for 360-degree movement to look at everything in the virtual environment, but participants also tend to turn around quickly and will automatically reach out for things with their hands.
A standard swivel chair, like the kind found in any office, should do the job for 360 movement. Make sure it’s on a rug to prevent the chair from rolling around. Then, clear the area, so there isn’t anything in the way (like other bits of furniture or the aforementioned cups of water) for participants to knock into (legs come out further than you think when spinning in a swivel chair).
For the moderator, make sure you’re seated a comfortable distance away, so you won’t knock into participants. In the event you see a participant about to hit a glass of water or something else, try and move the object out of the way rather than touching the participant. It’s good advice for any usability session to not touch participants because they are in a virtual world. It’s highly likely it’ll scare them if they unexpectedly encounter something in the real world they can’t see.
Device hygiene
Cleaning your testing equipment in between sessions is always a good idea, but it’s especially important when testing in VR/AR simply because participants are likely to sweat more. The extra sweatiness could be down to cyber sickness, a warm room, the season or simply because VR testing is more active than a typical usability testing session.
Fortunately, you can buy changeable padding for most headsets. Some are made of materials that can be washed at the end of the day, and some are leather and can be wiped down with antibacterial wipes to ensure all participants receive a dry and hygienic headset.
So, keep the room cool, have wipes ready, change your covers between sessions and wash everything at the end of the day.
Device management & set up
A phone running out of battery during testing is a wasted session. If you are testing using a phone-linked VR headset or using an AR app on a phone, be aware that these apps are very power hungry and will quickly drain the battery of your testing device.
VR and AR apps also cause phones to overheat as the phone must work very hard to load these apps, so the phone could overheat to dangerous levels. Not only can this cause damage to phone if it overheats several times in a session, but it could also be dangerous for the participants.
To combat these issues, try to have a spare phone on hand in case of disaster, factor in some cool down time between sessions, and use this time to turn off the phone and recharge the battery.
When it comes to setting up the device for a session, decide in advance who will be doing the set up. It may be that you want the participant to set up everything as they would in a real-world situation, if that’s part of what you need to test.
If you’re only testing an app, then set everything up in advance. Participants may be unfamiliar with the technology and asking them to set it up, if it’s not within the scope of the research, will waste time. If you are setting up the tech, make sure you are facing the same direction the participant will be facing. You don’t want to be in a situation where the test environment appears behind the participant in the virtual world when they first put on the device.
Session observation
When it comes to observing VR/AR usability sessions, there are a couple of things to consider. When using a VR headset in particular, participants will see a full virtual world they are able to explore freely. However, it is difficult to translate this view onto a traditional monitor for observation.
One solution is using a stereoscopic view which shows both ‘eyes’ of the participant through a basic projection of what the participant sees. Whilst this view is fine in theory, it can be very tiring for the moderator to watch two things at once, especially over a full day of research. Looking at both the screen to see what the participant is seeing and at the participant themselves to see their body language when using the device (and to also check they aren’t going to bash into anything) adds to the complication.
We found a way around this issue is to opt for a monoscopic view, which is suitable for observation and also allows for a picture-in-picture (PiP) view, so a moderator can observe the participant using the VR device whilst also observing what the participant is seeing in the virtual space. This setup makes it much more enjoyable and engaging to watch, and the exported videos look great when sharing with clients and stakeholders. This setup also works for AR testing, showing the view from the phone alongside the participant using it.
In terms of casting, we use typical solutions like Chromecast, Reflector 4 and Bandicam, and any IT lab professional should be able to easily and relatively inexpensively recreate this set up.
In summary, stereoscopic viewing is hard on the observer, so a monoscopic view should serve your moderation needs. Having a monoscopic view with PiP to see the participant will help you see what they see whilst keeping an eye on the participant themselves. People do tend to gesture more than normal in VR, so observing their body language is key for testing.
Final thoughts
VR and AR are becoming far more prevalent and available as the technology advances, so more and more people will be using the technology. The above guidance will help ensure your participants are comfortable, your moderator is comfortable, and that you’re getting the most value from your extended reality testing.
If you would like to discuss with us how we can help you with VR or AR testing, please get in touch.
Learn more
- Blog post: Extended reality: From VR to AR and everything in between
- Blog post: What’s the difference between AR, VR, XR and MR?
- Blog post: How to design for Virtual Reality

Related Posts