Technology’s moving fast, isn’t it? Too fast for natural and effective mobile usability testing solutions to be on the market for the increase in apps and mobile sites we are seeing. Taking inspiration as we go, and getting as close to natural behaviour as we can, we are building the Dream Mobile Testing Rig. This blog is about that journey and will help you to understand the pros and cons of what is out there when choosing mobile testing solutions.

When you are comparing mobile usability testing solutions, here are a few things to look for to achieve the best results:
- Is it natural? Can it be held in one hand, for long times, without an obscured view, etc
- Is it adaptable? Does it allow for different mobile types – Smartphones, Blackberries, Keypads, Sliding, etc
- Is it personal? Can you use the participant’s own technology so the handset usability doesn’t interfere with results?
- Is it the full experience? Are you recording screen, face, fingers and comments to get a complete picture?
- Is it viewable? Can it be recorded and even watched live?
Our first iteration: “Look, but don’t touch”
Verdict 1/10: Quick and simple to test the initial stages of layout and language, but not good beyond this stage.
When mobile testing started, we used an emulator on screen to track designs just as we would a website. This is cheap, simple and effective for eye tracking and giving proof of information architecture and labelling. It can be recorded, viewed remotely and even eye tracked. However, it just isn’t natural. You’re not getting an idea of how the handset itself will affect the usability and not capturing the experience of trying to complete the task on a small screen with fingers and thumbs.
Second iteration: Getting heavy
Final score: 4/10: Lighter materials and more grip on the clip and this setup would be a winner.
For our first truly mobile rig, we clipped a soft-clip poseable camera to the top of any phone, focused on the screen. This allowed people to use their own phones and hold them naturally as they move around. The weight of the clipped rig was the only issue – making it heavy to hold the phone and would make the whole rig shift occasionally during testing, losing sight of what is happening. Participants can be perturbed by you attaching a big, heavy clip to their precious, delicate technology!
Third Iteration: The glasses cam
Final Score: 7/10 Participants loved it, but caused extreme motion sickness amongst viewers.
We had a project come in for the iPad, which forced us to rethink the solution. We went for a camera attached to a pair of glasses, which meant we could track exactly where the participant was looking on the screen and what they touched plus a fixed camera on the desk to record their facial expressions. It worked really well for the participant, but left viewers feeling motion sick.
Fourth iteration: Our most recent baby
Final score: 8/10 Well adopted and natural to hold, but could still be lighter and should remove tray sides.
We took the clip set up from our first design, knocked some weight off, added some stability and attached it to a plastic tray that the phone just sits in to avoid slip. We added a second camera to the face and an audio clip to capture reactions. The cameras fed into a picture-in-picture control box and converted to 1024×768 VGA, big enough to view remotely on screen and be recorded. The tray accommodated all types of modern phones and helped the participants adopt it nicely, but the tray sides stop people holding the phone as they normally would.
Fourth Iteration: The Dream Rig
We’re planning to take the sides off the tray to make it more of a smooth sledge with little interruption to the natural feel of the phone. We’re happy with a cameras and an audio clip, but we need to make the device arm as lighter, so we’re constantly sourcing and testing new equipment. The facial expressions camera being on the table captures more, let’s them move more and captures both body and face, so that’s here to stay. Making the connection wireless would mean we could test in the field, allowing people to use their phones as naturally as possible in all situations.
Of course, a design that was virtually invisible would be the dream – but this is probably a long way off…
The options we dismissed and why

Screen Recording Applications: These you just download onto a phone to record the interaction
There are actually a few screen recording applications out there but they all have the same disadvantages. There is no app which will support all the different mobile platforms and devices. The results they deliver aren’t great; the video files do often have lagging issues and just a few mobile screen recorders actually record the touch points on smart phone screen.
Generally, people were upset enough about us clipping a camera onto their mobile, I can’t imagine they would react kindly to us wanting to download software onto their phone.

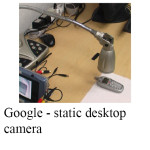
A static document camera: Fixed on the table, records interaction from above
This is lovely for getting a clear view of the interaction, but in that case the phone must be held at a flat angle or lay on a desk and the participants must keep within the camera range, which is not a natural way for people to interact with their mobile. Take a look at the image of how Google have been testing on their mobile – the document camera is quite intrusive when you have to lean over to see the screen as it is.
We’re aiming to bring as natural a feel as possible to testing, so we are always aiming to make solutions that allow us to test mobile websites or mock-ups in the urban field, their natural habitat. So, in the future, static cameras are also not our weapon of choice.
Further reading:
This presentation includes all the testing rigs that are out there – it’s more for people looking to build their own rig, but can give you some good insight as someone looking to test about what to look for in your mobile usability solution.
http://www.slideshare.net/beleniq/do-it-yourself-mobile-usabilitytesting-at-euroia-2010
Here’s some really nice, lightweight looking trays that can be made for a fiver. They’re still not perfect, we prefer the poseable camera, but they look smart and are a great way of cheaply making your own.
http://www.90percentofeverything.com/2010/05/07/quick-tip-make-your-own-iphone-usability-testing-sled-for-5/
http://www.90percentofeverything.com/2010/11/15/more-mobile-usability-testing-sleds/


